This weeks task is to create circuit blocks. This involves:
- cutting bits of wood to fit circuit components on
- sanding them down
- attaching the components
- adding bits of wire and nails where necessary
- soldering said bits of wire to said bits of nail
- testing out and playing with the finished bits
To cut the pieces I considered using the scary saw (circular saw but it scares me slightly as it broke the first time I tried to use it ages ago and I haven’t been near again since) but opted for using a normal saw instead. The results are slower but fine really. Sanding wasn’t a problem I have done plenty of that when decorating, and screwing the bits down was easy enough.
There were some new(ish) skills for me here – I haven’t really done any soldering since woodwork at school which was many years ago now. Coincidentally (and luckily for me) I was scheduled to work part of the Science Summer Camp week at work that took place at the beginning of the summer holidays and part of that day involved a lesson in soldering – hoorah! 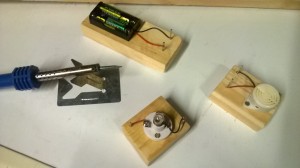
I think my soldering was not too bad – I even remembered to heat the surface I want to solder rather than the solder itself (with reasonable success I think).

Here’s the first circuit I got to work. It’s pretty basic but it made me happy. It didn’t work to begin with but that’s because I managed to melt part of the plastic around one of the wires while I was soldering. I had to take it apart and strip more wire to stop it from being insulated. Oops! Hopefully I won’t be making that mistake again.
I have a couple more bits to mount – I want to try a couple of bulbs in a row and have some switches to try out too…
